
In my previous post regarding my satellite ground station I chatted about the basic hardware and setup that I decided to go with. In this post I figured I would expand a bit more on the software side of what I hacked together.
The concept is fairly simple. I have two rotators that need to be controlled. I would like to not only have manual control, but also be able to select presets and more importantly I need to be able to control it from satellite prediction software. There are numerous Arduino solutions for a rotator, but after playing with a few of them I found that they were overly complicated and trying to cater for lots of different hardware. But they all have the basic concept of using an Arduino, a couple of relays and some kind of feedback measure. I decided to do something similar from a hardware point of few, but I wanted the code on the Arduino to be as simple as possible. All it needs to do is receive a value (Azimuth or Elevation depending on the controller). Based on the feedback from the internal rheostat it then needs to move to the required positions. Since it is two separate controllers I decided to keep controller for each also separate. This means for each rotator controller I have the arduino, two relays and an analog input.
After modifying the HAM IV rotator both rotators now have seperate outputs that I can use on 5v for the analog inputs. This is the complete controller for one rotator:

As mentioned the entire controller is kept as simple as possible, receive input, based on input and feedback move to desired position while sending feedback to computer of its current position. The complete code looks like this:
// basic azimuth controller
// ZR6TG

int rotatorADC = A0;
int relayPower = 2;
int relayDirection = 3;
const int numReadings = 10;

void setup() {
  Serial.begin(9600);

  pinMode( relayPower, OUTPUT);
  pinMode( relayDirection, OUTPUT);

  digitalWrite(relayDirection, 0);
  digitalWrite(relayPower, 0);
}

int prevActualRotatorValue = 0;
int actualRotatorValue = 0;
int rotatorValue = 0;
int count = 0;

int commandRotatorValue = -1;

void loop() {

  count += 1;

  int rotatorValue = 0;

  // basic noise smoothing
  for ( int c = 0; c < 20; c++ )
  {
    rotatorValue += analogRead(rotatorADC);
    delay(5);
  }

  rotatorValue = rotatorValue / 20;

  float actualRotatorValueRaw = rotatorValue;

  float actualRotatorValue = float(map(actualRotatorValueRaw, 0, 1023, 360, 0)); ;

  // read position wanted input
  if (Serial.available() > 0)
  {
    int readValue = Serial.readStringUntil('\n').toInt();

    if (readValue > 360 )
      readValue = 360;
     if (readValue < 0)
      readValue = 0;

    commandRotatorValue = readValue;

    Serial.println(commandRotatorValue);
  }

  // send current position over serial port when changed or after a bit of time
  if ((prevActualRotatorValue != actualRotatorValue) or count > 10)
  {
    count = 0;
    String azData = "A,";
    String str2 = String(actualRotatorValue);
    Serial.println(azData + str2);
    prevActualRotatorValue = actualRotatorValue;
  }

  if ( commandRotatorValue > -1 )
  {
    int diff = abs(actualRotatorValue - commandRotatorValue);

    if (  diff > 3 )
    {
      if ( actualRotatorValue > commandRotatorValue )
          digitalWrite(relayDirection, 1);
      else
        digitalWrite(relayDirection, 0);

      digitalWrite(relayPower, 1);
    }
    else
    {
      digitalWrite(relayPower, 0);
      digitalWrite(relayDirection, 0);
      commandRotatorValue = -1;
    }
  }

  delay(100);
}
As you can see there isn’t much to it, but it works well and is easy to debug. The next step was to bring it all together into something useful. One of the main requirements was to control all of this via my network with some kind of web interface. I originally wanted to develop something from scratch, but then decided to settle on a networked raspberry pi running Node-Red.

If you don’t know Node-Red then the basic description from their website explains it well.
“Node-RED is a programming tool for wiring together hardware devices, APIs and online services in new and interesting ways.”
It has a very visual interface where you build up a flow. A flow consists of various blocks deciding what it needs to do next. It has modules for a lot of hardware interfaces. The complete flow of my station looks something like this:
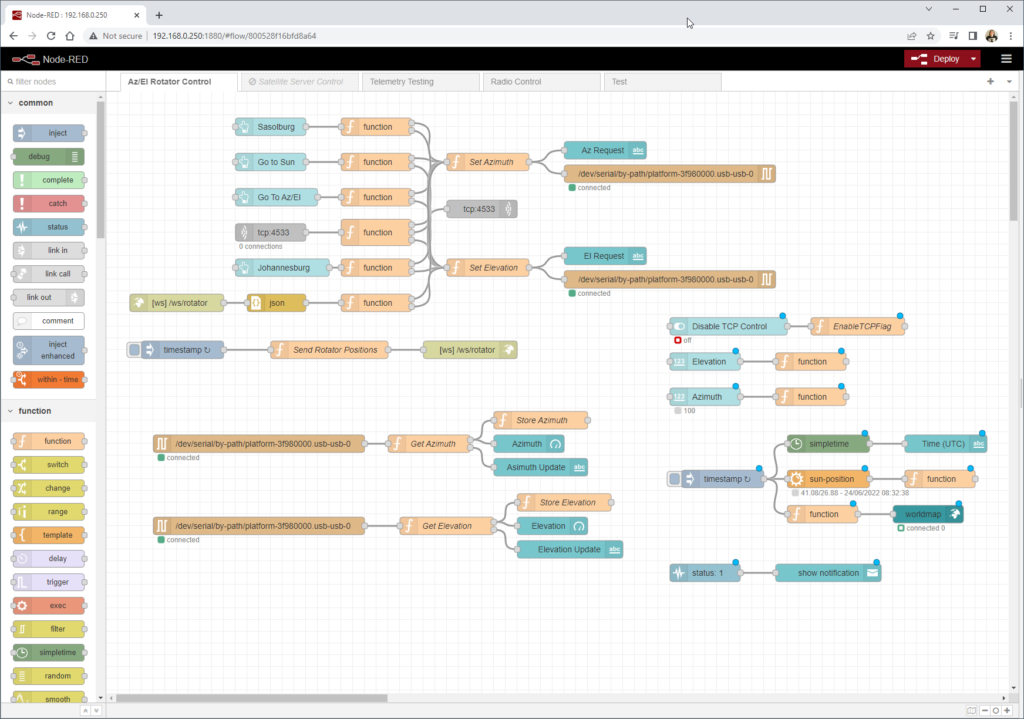
If it looks complicated then don’t worry, its fairly simple and can be divided into the following sections:

The first section uses the Serial Port block and connects to the Arduino. It receives the current sensor data and in the process saves the values in global variables for other functions, but also displays it on our Node-Red Dashboard. This is almost identical between the Azimuth and Elevation controller.


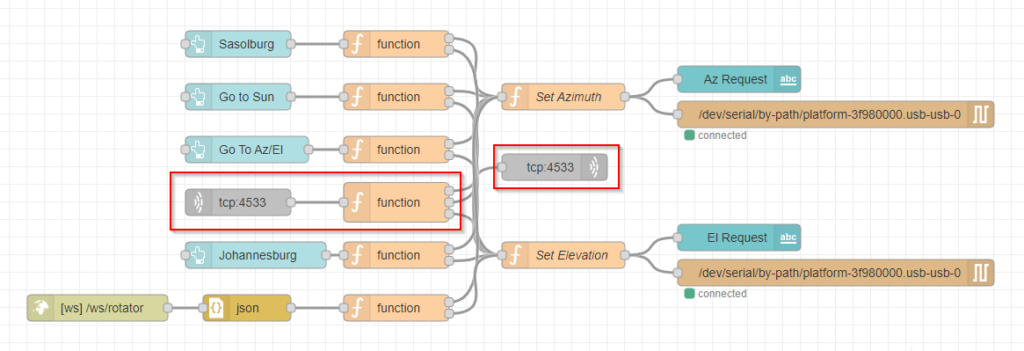
One of the requirements for my station was to be able to control it from applications like gpredict. Gpredict normally communicates to rotctld which is a Hamlib TCP rotator control daemon to support a variety of commercial and DIY rotators. In the above TCP and functions block I ported the basic protocol between gpredict and rotctld. This means that gpredict thinks its talking to rotctld, but instead I get the commands in my flow and therefore can change the rotator based on the commands received. Its a fairly simple implementation but it works well. So essentially any rotator control application that support rotctld can now be used to control my rotators. The implementation not only receives the basic control commands but also sends the stored Azimuth and Elevation data back to the application. The configuration in gpredict looks like this:

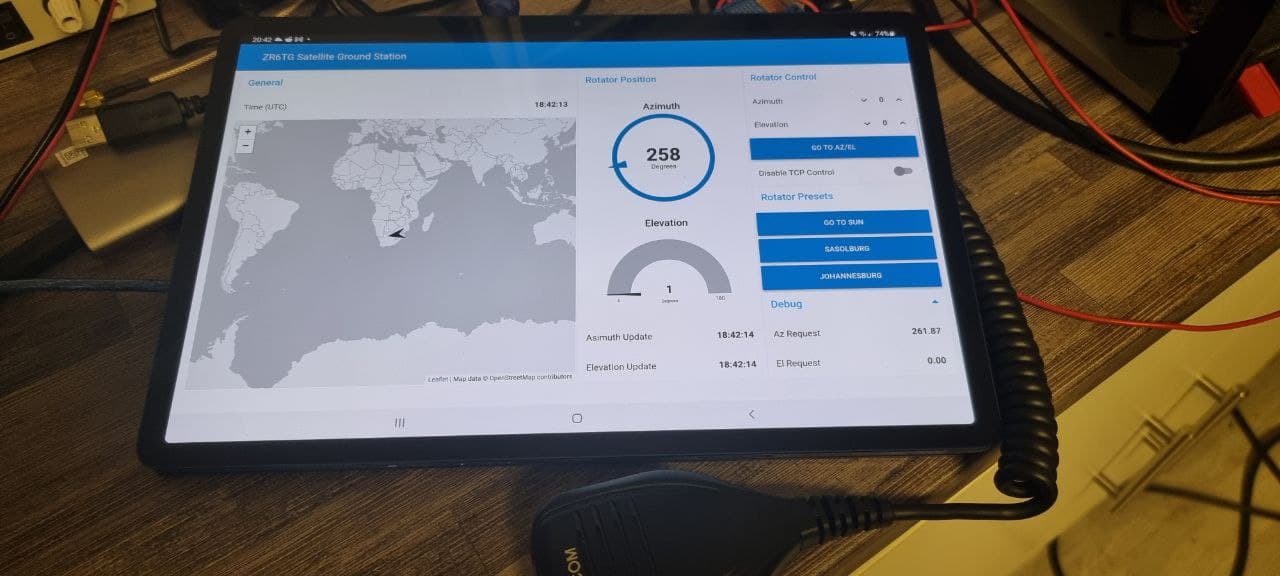
The rest of the flow is a few helper functions and dashboard utilities. For example setting up my QTH location for the Sun Position node, a current time node and a switch to enable and disable the TCP control (The rotctld implementation) and also show a map with rotator position on it. The dashboard looks something like this:

Lastly you might have noticed the Websocket blocks in the flow. This is not essential to the main station but rather a gateway between my satellite station and a satellite prediction server that I’m developing, its still a work in progress, but will have more information in a future post about that side.
If you are interested in my flow then you can get it here, but keep in mind that you most likely will need to modify it specifically to your needs.
That covers most of the software that I put together in the station. From this I can control my DIY Az/El Rotator in many ways, including using most Satellite Prediction Software. I’ll do another post where I outline the usage of the station and the upgrades I have done since starting this project. Happy Satellite Hunting.
73
2 thoughts on “Satellite Ground Station V1 – Part 2”